Construction Technology Card: Repair of Roof Membrane Junctions Using Hot-Applied Bitumen-Polymer Material
Materials
- Bitumen-polymer roll-applied roofing material (torch-applied), based on fiberglass mat, polyester fabric, or fiberglass fabric, with various types of protective layers (polymer film, fine particulate, fine-grained, or coarse-grained mineral surfacing). Material mass: from 2.5 to 5.0 kg/m².
- Fiberglass fabric (for junction reinforcement)
- Bitumen mastic (for impregnation and adhesion)
- Bitumen primer: solution of bitumen BN-90/10 in naphtha, in a 1:2 ratio by mass (for substrate priming)
- Anti-corrosion compound (for treating metal elements)
- Cement-sand mortar (for plastering and filling chases)
- Antiseptic-treated wooden plugs (for fastening blocks to masonry)
- Antiseptic-treated wooden block (for fastening the roof membrane)
Equipment
- Gas burners (for material torch-application)
- Cylinders for liquefied propane-butane
- Compacting rollers (for firm material pressing)
- Smoothing squeegees/spatulas (for material smoothing)
- Cleaning tools (brushes, scrapers) and dismantling tools (knives, axes)
- Brushes and rollers (for applying primer and anti-corrosion compounds)
- Drills/rotary hammers (for installing anchors and plugs)
- Metalworking tools (tin snips, welding machine – if necessary)
1. Scope of Application and Material Characteristics
This technological card covers the repair of roll-applied roof membranes at their junctions with various structural elements. These elements include internal roof drains, vertical surfaces (walls, parapets, railings), ventilation pipes, aeration lanterns, and expansion joints. The primary material used is a roll-applied membrane, consisting of a reinforcing base (fiberglass mat, polyester non-woven fabric, or fiberglass fabric), coated on both sides with a bitumen-polymer compound and protective layers.
The bitumen-polymer material consists of low-oxidized bitumen, modified with styrene-butadiene-styrene (SBS) thermoplastic elastomers, and a non-woven fiberglass or polyester base. The material is produced in various modifications for bottom, middle, and top layers. For bottom and middle layers, variants are available with a polymer film on one (P) or both (PP) sides, mineral dust or fine-grained surfacing on one (M) or both (MM) sides, or dust surfacing and polymer film (MP) on fiberglass mat (X), polyester fabric (E), or fiberglass fabric (T) bases, with a mass from 2.5 to 4.0 kg/m². For the top layer (without gravel protection), material with a polymer film (P) on the underside and a coarse-grained (K) surfacing on the face side is used on similar bases, with a mass from 3.5 to 5.0 kg/m².
This roll-applied material belongs to the category of torch-applied materials, which allows its use for constructing and repairing roofs at different times of the year without using adhesive mastics. It is intended for installation on rigid substrates, such as reinforced concrete slabs, cement-sand screeds, and asphalt screeds, pre-primed with a bitumen solution (e.g., bitumen BN-90/10, dissolved in naphtha in a 1:2 ratio by mass). The material is characterized by a thickness of 4.5-6.0 mm, a binder layer mass from below of not less than 2000 g/m², a brittleness temperature down to -30 °C, flexibility on a 10 mm diameter bar at -30 °C, tensile strength of not less than 360 N/50 mm, and a service life of 20-25 years. Data on heat resistance, total binder mass, and water absorption are not standardized or provided.
2. Work Organization and General Requirements
Before commencing any roof repair work at junction areas, a detailed inspection must be carried out. Based on the inspection results, a roof defect register is compiled, accurately specifying the nature and scope of the upcoming repair work. This approach ensures systematic and efficient repair processes.
Repair of roll-applied roofing at junction areas aims to eliminate a wide range of defects. These include membrane tears and leaks at connections with roof drains, detachment of additional waterproofing membrane and flashings from protruding vertical elements, roof slippage near vertical surfaces, appearance of cracks in the waterproofing membrane at junctions with vertical structures, roof leaks at ventilation pipe penetrations, cracks in the membrane layers at aeration lantern corners, as well as cracks, detachments, and tears in expansion joints.
Roof membrane repairs must be carried out in the shortest possible time without prolonged interruptions to minimize risks from adverse weather conditions. Work may only commence after all necessary materials have been fully prepared. At the end of each work shift, the repaired section must be securely covered with new materials, and all measures must be taken to prevent atmospheric precipitation from entering the underlying layers of the roof membrane. In case of unfavorable meteorological conditions (e.g., rain, strong wind), defect remediation causing leaks must be carried out under temporary protective shelters or films.
3. Hot-Application Technology for Bitumen-Polymer Membrane
Torch-application of roll-applied bitumen-polymer material is performed by heating its mastic layer from the underside using gas burners operating on liquefied propane-butane. In cold weather, rolls must be kept in a warm room before use, and then transported to the work site in insulated containers to maintain the material's optimal temperature.
The torch-application process involves simultaneous heating of the thickened bottom layer of the roll-applied material and the roof substrate or the surface of a previously installed layer. After heating, the roll is gradually unrolled, firmly pressing it to the substrate and smoothing it with a roller or specialized squeegees. The surface of the installed material must be perfectly even, without wrinkles, bumps, or other irregularities, ensuring proper contact with the substrate.
Gas burners should be positioned so that the heat flow is evenly distributed across the entire width of the roll, ensuring simultaneous and controlled heating of both the material and the surface to which it is being torch-applied during unrolling. This is critically important for forming a homogeneous adhesive joint. A visual criterion for adequate unrolling speed and sufficient heating is the formation of a small bead of softened (melted) bitumen-polymer coating mastic directly in front of the unrolling roll. If, however, the bitumen-polymer mastic starts to flow out from under the roll in significant volume, this indicates overheating of the material, which can lead to a loss of quality of the coating layer and a deterioration of performance characteristics.
4. Repair of Junctions to Internal Roof Drains
Repairing the junction of the roof membrane to an internal roof drain is a critical stage, requiring strict adherence to technology to prevent leaks. This process is carried out in several sequential steps, providing multi-layer protection and reliable waterproofing. The dimensions and order of layer application are critical for the durability of the repair.
Each material layer is carefully adhered or torch-applied, ensuring full contact with the substrate and the drain walls. Special attention is paid to sealing all joints and transitions. Installation of the drain dome and protective layer completes the scope of work, ensuring the functionality and longevity of the drainage system. The repair process includes thorough surface preparation, multi-layer torch-application of roll-applied material, and secure fastening of drainage elements.
All repair steps are aimed at creating a durable and watertight junction that will withstand operational loads and atmospheric exposure throughout the roof's service life. The quality of execution at each stage directly impacts the reliability of the entire roofing system.
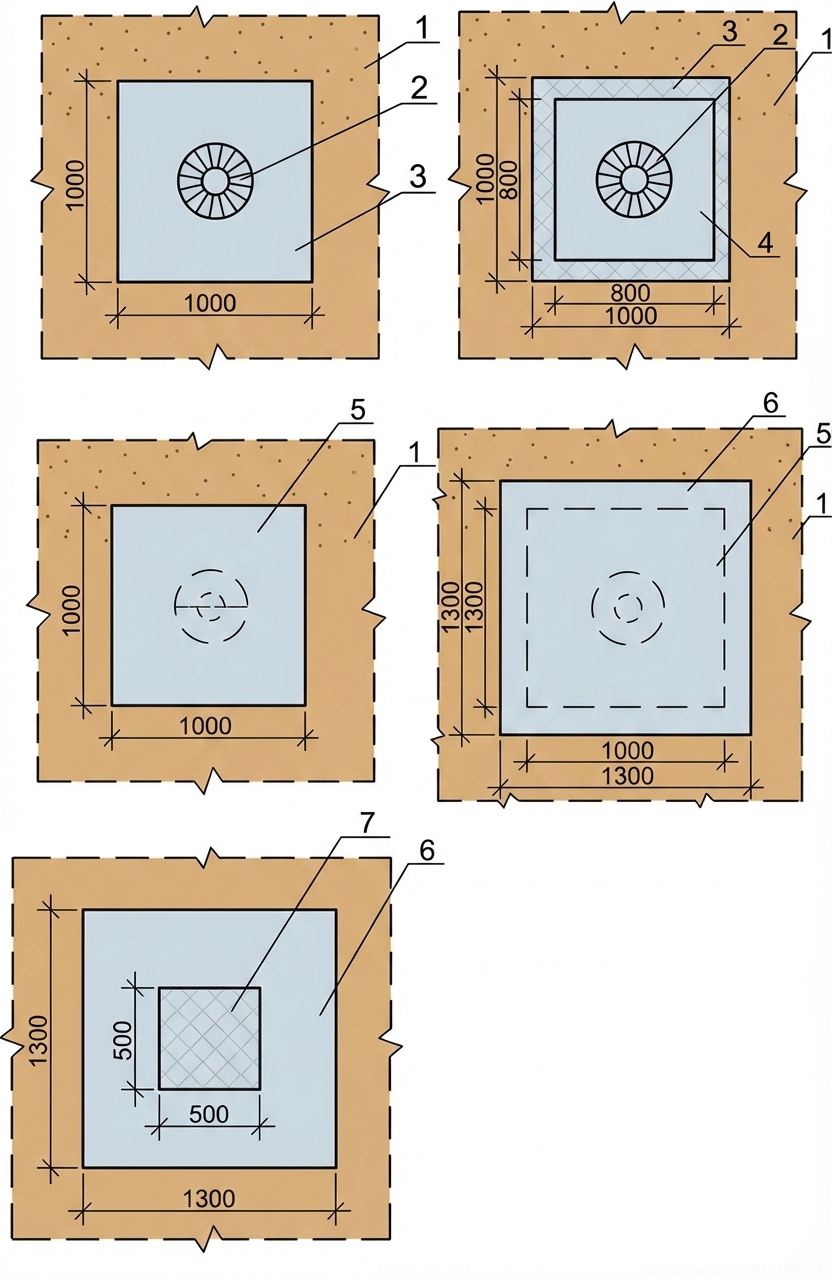
- Remove the drain dome and clamping ring. Clean the internal roof drain from rust and coat with an anti-corrosion compound. Remove the old roof membrane from a 1000x1000 mm area around the drain.
- Clean and dry the substrate for the roll-applied material. The substrate surface must be even, without wrinkles or bumps.
- Adhere an 800x800 mm layer of fiberglass fabric, impregnated with bitumen mastic, around the drain, extending it into the drain pipe bowl. Make a cross-shaped cut at the center of the drain, fold the resulting corners downwards, and press them firmly against the wall.
- Torch-apply a 1000x1000 mm layer of bitumen-polymer material around the drain, butt-joining it with the old roof membrane. After making a cross-shaped cut in the center of the drain, firmly press the material against the wall.
- Torch-apply two additional layers of bitumen-polymer roofing material, each approximately 1300x1300 mm (with an overlap of 150 mm onto the old roof membrane), minimizing the thickness of the newly adhered layers. Make a cross-shaped cut and adhere to the drain wall.
- Torch-apply two additional layers of bitumen-polymer material and adhere a 500x500 mm layer of fiberglass fabric over the main membrane, clamping them between the clamping ring and the drain.
- Install the drain dome, securing it to the clamping ring with bolts, and apply a protective coating layer.
5. Repair of Junctions to Vertical Surfaces
Repair of roof membrane junctions to vertical surfaces (walls, parapets) requires a special approach depending on the nature of the damage, whether it is detachment, slippage, or cracks. When working with brickwork, secure fastening of the upper edge of the waterproofing must be provided. When working with concrete surfaces, the use of additional fastening elements, such as steel strips, is required to ensure durability. Quality surface preparation and the use of antiseptic-treated materials are always ensured when using wooden elements.
In cases of roof membrane slippage, it is important to completely remove all damaged layers and mastic, thoroughly clean the substrate, and then install a new waterproofing membrane with secure fastening. Special attention is paid to restoring the protective layer and flashings. This not only guarantees the elimination of the current defect but also prevents its recurrence.
In the presence of cracks in the layers of the waterproofing membrane at junctions to vertical surfaces, repair work includes dismantling damaged layers, and if necessary, installing sloped transition fillets to improve water drainage and even load distribution. After this, new layers of bitumen-polymer material are torch-applied with appropriate overlaps, and protective flashings and finish coatings are restored. These measures ensure the watertightness and durability of the junction.
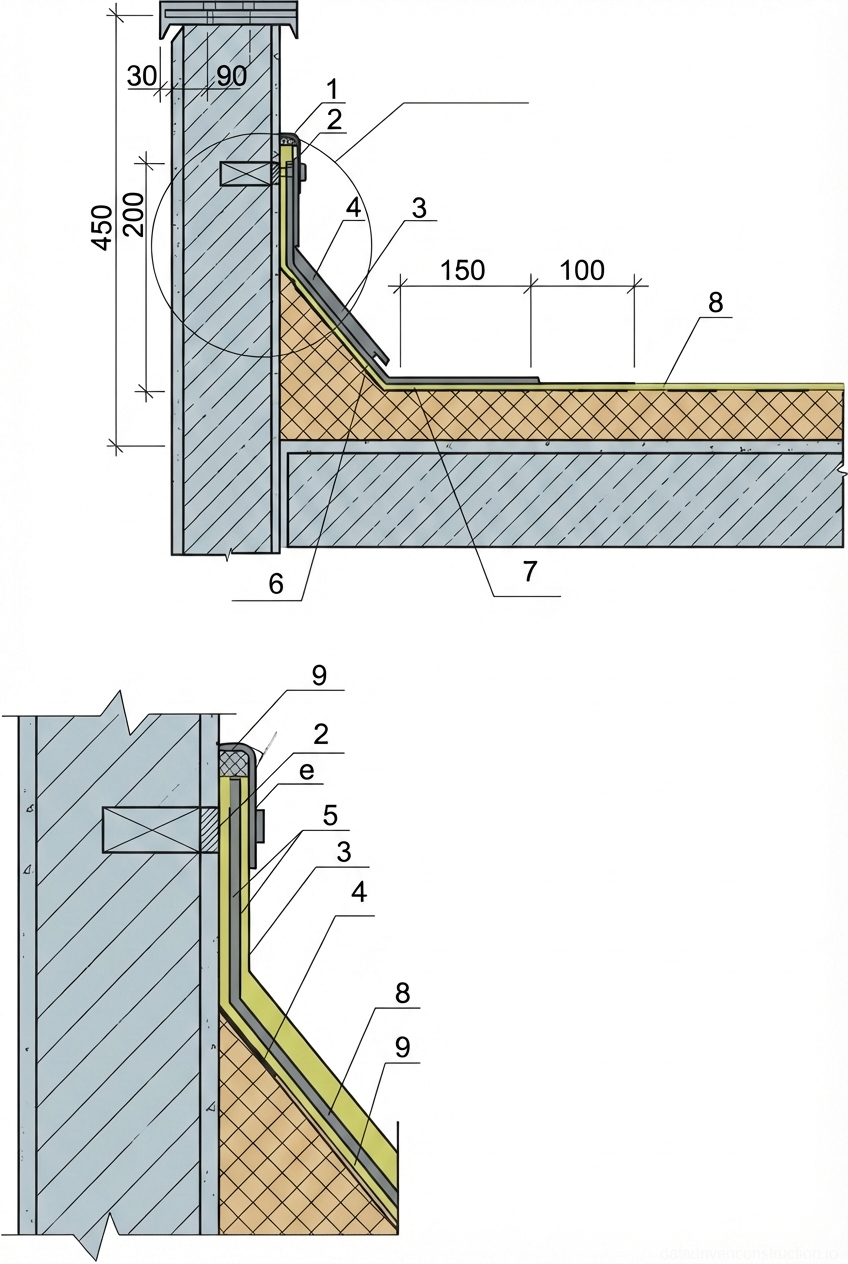
- **For detachment from brickwork:** Remove the protective flashing, fold down the detached roll-applied membrane. In the protruding surface (brickwork), create a chase and install wooden plugs (at a height of not less than 200 mm from the roof base). Secure an antiseptic-treated wooden block to the plugs.
- Plaster the junction surface below the wooden block with cement-sand mortar and prime it. Clean the folded-back part of the waterproofing membrane from dust and prime it. Apply hot roofing mastic to the vertical junction surface and the folded-back membrane portion, then firmly bond them together.
- Nail the edge of the folded-back membrane to the wooden block. Torch-apply an additional layer of bitumen-polymer roll-applied material using a gas burner. Install protective flashings, securing their edges in the chase, and fill the portion of the chase above the protective flashing with cement-sand mortar.
- **For detachment from concrete surfaces:** Additionally, secure a steel strip to the concrete surface using anchors. Fasten the upper edge of the protective flashing to the steel strip. Trim the edge of the roll-applied membrane and seal the joint between the concrete surface and the protective flashing with appropriate mastic. Paint the mastic with a protective bitumen paint.
- **For roof slippage:** Release the old roof membrane from its top fastening and remove all remaining sheets of roll-applied materials along with the sagged mastic. Clear the waterproofing membrane at junction areas of the protective layer or coarse-grained surfacing over a width of 350-400 mm.
- Install layers of additional waterproofing membrane made of bitumen-polymer roll-applied material, securing the membrane at the top. Apply a protective paint layer. Install protective flashings.
- **For cracks in the waterproofing membrane layers:** Remove or fold back the protective flashing and remove the layers of roofing material located above the crack.
- If necessary, install a sloped transition fillet (100x100 mm) made of cement-sand mortar, sand asphalt concrete, or lightweight concrete at an angle up to 45° and a height of not less than 100 mm, ensuring the transition from the main roof plane to the protruding structure.
- Clear the waterproofing membrane of its protective layer or coarse-grained surfacing over a width of not less than 400 mm from the crack edge.
- Torch-apply two layers of bitumen-polymer roll-applied material with the lower edge of the sheets overlapping the main waterproofing membrane by at least 100 mm.
- Install the protective flashing and restore the protective paint layer, as well as the coarse-grained surfacing layer.
6. Repair of Junctions to Ventilation Pipes
Repair of roof membrane junctions to ventilation pipes is critically important for ensuring roof watertightness, as these junctions are often subjected to thermal deformations and atmospheric precipitation. For effective crack elimination and prevention of future leaks, it is necessary not only to replace damaged layers but also to create a reliable transition junction using sleeves and insulation.
A key element in this process is the installation of a galvanized steel or PVC sleeve, which provides the necessary gap for movement compensation and subsequent filling with insulation. This creates a barrier against moisture penetration and improves thermal insulation. A sloped transition fillet further aids water runoff from the vertical structure.
Multi-layer torch-application of bitumen-polymer material with appropriate overlaps, as well as reliable sealing and installation of a protective umbrella, guarantee the durability and watertightness of the repaired junction. Quality execution of each stage ensures the reliability of the entire junction and prevents operational problems.
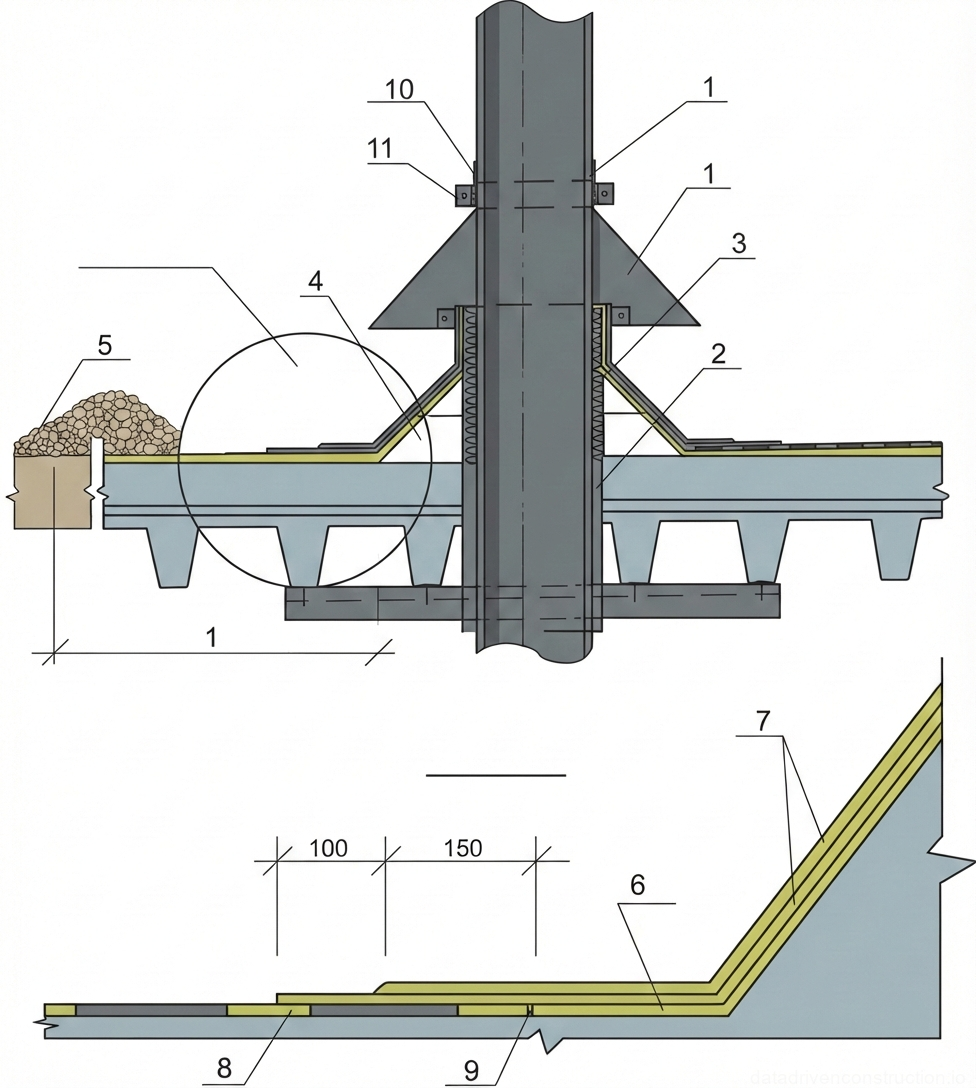
- Remove the protective umbrella (cap). Remove portions of roofing materials and substrate materials located above the crack.
- Install a sleeve made of galvanized roofing steel or polyvinyl chloride, 250 mm high (for water-filled roofs, 350 mm), measured from the roof base, around the pipe perimeter (with a 20-25 mm gap). Fill the space between the sleeve and the pipe with mineral wool insulation.
- Install a sloped transition fillet.
- Clear the waterproofing membrane of its protective layer or coarse-grained surfacing over a width of up to 1 m around the perimeter from the bottom of the transition fillet.
- Torch-apply two layers of bitumen-polymer roll-applied material with the lower edge of the sheets overlapping the main waterproofing membrane by 150 mm and 100 mm (for each layer, respectively).
- Install the protective umbrella, welding it to the pipe or attaching it with a clamp, followed by sealing with mastics. Restore the protective paint layer.