Construction Technology Card: Sealing Joints of Large-Panel Buildings with Two-Component Butyl Rubber Mastics
Materials
- Two-component vulcanizing butyl rubber mastic (48 kg per 100 m of joints) – Type 1 (for dry surfaces) and Type 2 (for dry and wet surfaces)
- Primer based on butyl rubber mastic (10-15% concentration, 4 kg mastic + 8 kg solvent per 100 m of joints)
- Solvent (e.g., white spirit, or specialized solvent type BR-1) (8 kg per 100 m of joints)
- Sealing gaskets (elastic rods, e.g., 35 mm diameter – 50 kg per 100 m of joints) – type 'Butapor', 'Gernit', 'Vilatherm S'
- Air-barrier tape (e.g., 100 mm wide – 50 m per 100 m of joints)
- Adhesive mastic (for air-barrier tape – type KN-2, KN-3)
- M-100 cement mortar (strength class not lower than C8/10) (0.02 m³ per 100 m of joints)
- M-200 concrete (strength class not lower than C16/20)
Equipment
- Stationary mixer for sealing mastics (based on a mortar mixer) – for preparing mastic and primer working mixtures
- Mastic application unit (pneumatic caulking gun or similar apparatus)
- Compressor (for joint blow-off and spraying primer/protective coating)
- Spray gun (for priming joint surfaces and applying protective coating)
- Suspended platform (cradle) or suspended working platform (for high-altitude work)
- Set of spatulas (for applying and leveling mastics, crack filling)
- Flat brush (for applying primer compound and protective coating)
- Wire brushes (for joint cleaning)
1. Scope of Application and General Requirements
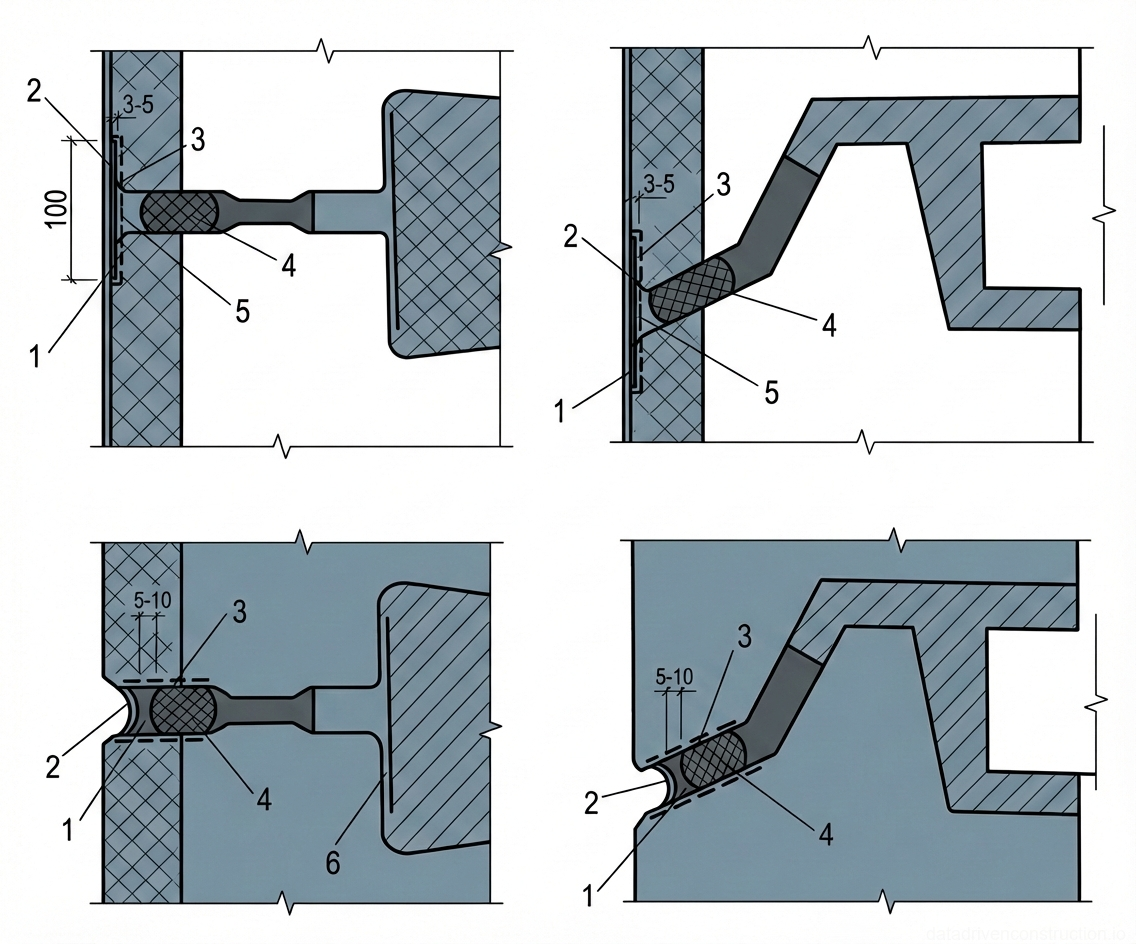
This construction technology card applies to the sealing of butt joints in external walls of large-panel residential and public buildings using two-component vulcanizing butyl rubber mastics. The main design solution provides for a closed-type joint, applicable to both vertical and horizontal connections. A standard solution for a closed-type joint assumes a gap between panels of 20 mm or more. For gaps in the range of 20 mm to 30 mm, a layer of mastic is applied to the pre-primed surfaces of the panel edge and onto an elastic backing (sealing gaskets), followed by the application of a protective coating.
Mastics differ according to application conditions: one mastic modification can only be applied to a dry surface, while another modification allows application to both dry and wet surfaces. Mastic application works must be carried out in an ambient air temperature range from minus 20°C to plus 30°C. The operating temperature range for sealed joints is from minus 50°C to plus 80°C.
2. Work Organization and Preparation
Before commencing works on sealing butt joints of external walls in large-panel buildings, a series of preparatory measures must be completed. All necessary material and technical resources, including materials, equipment, and tools, must be delivered to the site. Machinery, such as mixers and compressors, must be connected and checked for serviceability, and suspended scaffolds – installed in accordance with design requirements and safety regulations. Personnel, consisting of a sealing crew, must be instructed and trained in work execution rules and safety procedures.
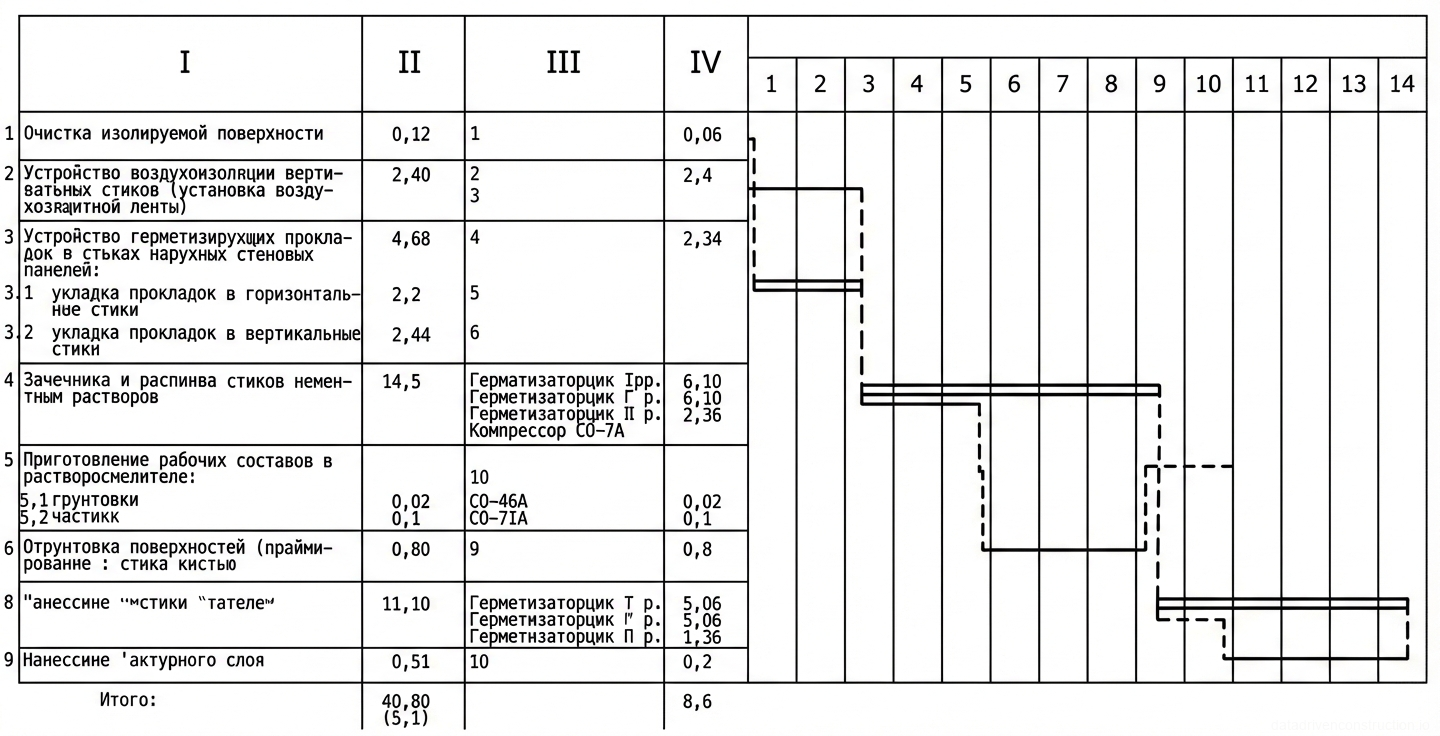
Two-component mastics are prepared immediately before use by thoroughly mixing the components. Joint sealing works are performed by a specialized crew consisting of three individuals with qualifications of Grades II, III, and IV. Distribution of duties within the crew is as follows: two workers (Grades III and IV) operate on a suspended scaffold, performing all joint sealing operations. The third worker (Grade II) performs air barrier installation operations from the floor slabs, is involved in preparing sealing materials and, if time permits, also performs joint sealing operations.
Organization of the work process on the building facade involves dividing it by vertical joints into work sections, the width of which corresponds to the width of the suspended scaffold. Upon completion of work in one section, the scaffold is repositioned to provide access to the remaining horizontal joints for their sealing. This ensures the sequence and efficiency of work execution.
3. Joint Sealing Technology
The full scope of works for sealing butt joints of external walls includes the sequential execution of several key stages, each of which requires strict adherence to technology. These stages include preparation of the joint surfaces, installation of the air barrier, laying of the sealing gasket, caulking of joint openings with cement mortar, preparation of the primer working mixture and its application (priming), preparation and application of the sealing mastic, and the final application of a protective coating.
- **Preparation of Joint Surfaces:** The panel surfaces to be sealed must be thoroughly cleaned of dust, dirt, concrete runs and splashes, and mortar spatters. Cleaning should be performed with wire brushes or spatulas, followed by compressed air blow-off to remove fine particles. All existing cracks, chips, and voids must be filled with M-100 cement mortar (strength class not lower than C8/10) using a trowel or spatula.
- **Air Barrier Installation:** An air barrier must be installed in the shafts of vertical joints. This process begins with preparing air-barrier tapes (e.g., air-barrier tape type). From the floor slab, a thin layer of adhesive mastic is applied to the panel edges on the shaft side. Then, the air-barrier tape is adhered and firmly pressed against the panel edges, smoothing it from the center outwards in the transverse direction. It is crucial to ensure no air bubbles are present under the tape at adhesion points. Air-barrier tapes should be applied storey by storey, before the installation of internal walls. After the completion of internal wall and partition installation, welding of embedded parts, and their anti-corrosion protection, the vertical joint shaft is filled with M-200 concrete (strength class not lower than C16/20).
- **Installation of Sealing Gasket:** Sealing gaskets (e.g., elastic gaskets type) are used as an elastic backing. The gasket is installed after the completion of floor (or work section) assembly using a wooden spatula or a specialized roller. Gaskets are selected and installed into the joint such that their compression degree is 30-50% of the diameter (width) of their cross-section. For example, for a joint width of 10 mm, a 20 mm diameter gasket is used; for 20 mm – 30 mm; for 30 mm – 50 mm; for 40 mm – 60 mm. For joint widths exceeding 40 mm, it is permissible to use 2-3 rods simultaneously, and the space between them is filled with antisepticized oakum to ensure stability and better air barrier performance. The gasket must be dry and clean. Its tensioning in the joint is prohibited. The gasket should be rolled into place in separate sections, moving the roller in different directions to prevent stretching. Gasket ends are cut diagonally (“mitered”) and glued at connection and intersection points. Extending gaskets along their length is performed at a distance of no less than 0.5 m from the intersection point of joints.
- **Caulking of Joint Openings with Cement Mortar:** After the installation of the sealing gasket, the joint openings are caulked with M-100 cement mortar (strength class not lower than C8/10) using a trowel. The mortar is applied exclusively inside the joint, preventing it from getting onto the panel edges.
- **Preparation of Primer Working Mixture:** The primer working mixture is prepared by introducing a vulcanizing agent into the main component and mixing in a mixer for 10-15 minutes. The required primer concentration (10-15%) is achieved by adding a solvent (e.g., white spirit or similar) in 0.5 L portions. It is recommended to prepare primer in small batches, intended for use within 1-2 hours, as the shorter the standing time before use, the lower the viscosity and, consequently, the greater the penetration depth into the concrete.
- **Priming of Joint Surfaces:** Priming of joint surfaces is necessary to improve the adhesion of the sealing mastic to the panel surface and increase the durability of the mastic joint. Priming can be performed both on the construction site and in factory conditions (in factory conditions, concrete impregnation is performed once). On the construction site, the prepared surfaces and panel edges are primed with a spray gun or brush, overlapping the cement-sand fill and extending onto the surface of the wall panels by at least 40 mm on each side.
- **Preparation of Sealing Mastic:** The sealing mastic working mixture is prepared in a stationary mixer. Before starting work, it is necessary to check the mixer's serviceability by running it in idle mode. The mastic components are unpacked, and the main component is loaded into the mixer's receiving hopper. After 5 minutes of mixer operation, the vulcanizing agent is added. The mastic components are mixed for 10-15 minutes. Mixing quality is considered satisfactory when uniform coloring of the entire mastic volume is achieved. The prepared working mixture must be used within one working shift.
- **Application of Sealing Mastic:** The sealing mastic is applied to the primed cement-sand base of the butt joints, overlapping onto the surface of the wall panels by at least 30 mm on each side. The total width of the applied strip layer of mastic should be 100-120 mm and fully cover the cement-sand base. The thickness of the applied mastic layer should be 3-5 mm. The mastic is applied with a pneumatic caulking gun or a spatula after partial vulcanization of the primer. The interval between primer and mastic application depends on the ambient air temperature: at -20°C — 120 min, at 0°C — 60 min, at +25°C — 30 min.
- **Application of Protective Coating:** A protective coating (paint) for the sealed facade joints is applied to the laid and partially vulcanized layer of sealing mastic using a spray gun or brush. The time interval between mastic and decorative-protective coating application also depends on the ambient air temperature: at -20°C — 6.0 min, at 0°C — 4.0 min, at +25°C — 2.5 min.
4. Quality Control of Works
Quality control for joint sealing works is carried out in three main stages: incoming inspection of components and working mixtures, operational control during work execution, and acceptance control upon completion of all stages. Such a multi-level approach ensures a high quality final result.
At the incoming inspection stage, the shelf life of components (adhesives, primers, sealants) is checked against the permissible values specified in the material quality certificates. Laboratory services monitor the preparation process of mastic and primer working mixtures, their compliance with declared characteristics, and suitability for current temperature and weather conditions. All test results, including data on air temperature and humidity, are recorded in the work execution log.
Operational control is carried out by the work supervisor (master) in the presence of the foreman. It includes checking the quality of surfaces prepared for sealing, the readiness of machinery, equipment, and tools. The crew's level of preparation, their knowledge of work technology, and safety regulations are also assessed. The master or foreman constantly monitors the quality of surface preparation, primer application, anti-adhesion layer installation, and the mastic itself. When preparing mastics, the accuracy of volumetric component dosing, adherence to mixing technology, and the appearance of the finished mastic (uniformity of coloring) are checked. The physico-mechanical properties of the mastic are determined by a construction laboratory. During primer application, the uniformity of the layer and its penetration depth into the concrete are controlled. When filling the joint with mastic, the material's shelf life, ambient air temperature, completeness of joint filling, uniformity of the mastic layer's placement, and the absence of tears and runs are checked.
Acceptance of sealing works is carried out by the client's technical supervision with the drafting of an act for hidden works. Intermediate acceptance, with the compilation of corresponding acts, is performed for stages such as surface preparation for priming, the quality of the primed concrete surface, the quality of the elastic backing and anti-adhesion layer, the applied sealant, as well as the filling with concrete and painting of the vulcanized sealant. All defective areas and methods of their remediation are recorded in the work execution log, and acceptance acts are signed only after the complete elimination of identified defects. Final acceptance is formalized by an act and requires the presentation of all intermediate acceptance acts, material laboratory test logs, the work log, and as-built drawings of joint sealing, confirming the compliance of the performed works with established quality requirements.
5. Technical and Economic Indicators and Material Consumption
Below are summarized technical and economic indicators, as well as the calculation of material consumption for sealing 100 linear meters of joints, which allows for resource planning and assessment of work efficiency. The duration of the sealing process for 100 m of joints is 1.7 shifts, and the labor intensity of the work is 5.1 person-shifts.
**Calculation of Sealing Mastic Consumption for 100 m of Joints:**
For contour (surface) sealing, the consumption of mastic applied as a strip layer, with an application width of 12 cm, a thickness of 0.4 cm, and a length of 100 m (10,000 cm), is calculated using the formula: P = V × ρ, where V – mastic volume, ρ – mastic density (taken as 1.0 g/cm³).
Mastic volume: V = 12 cm × 0.4 cm × 10,000 cm = 48,000 cm³.
Mastic consumption: P = 48,000 cm³ × 1.0 g/cm³ = 48 kg.
For priming with mastics diluted with a solvent (e.g., gasoline or white spirit), with an application width of 15 cm and a thickness of 0.08 cm, the primer consumption is:
P = 15 cm × 0.08 cm × 10,000 cm × 1.0 g/cm³ = 12 kg.
To obtain primer from mastics, they are diluted with solvents in a 1:2 ratio. This means that for 12 kg of primer, 4 kg of mastic and 8 kg of solvent are required. The total mastic consumption for priming and sealing is: 48 kg (sealing) + 4 kg (priming) = 52 kg.
**Cost and Expenses:**
The direct costs for sealing 100 m of joints include:
- Wages: 23.54 monetary units.
- Material cost: 140.00 monetary units (for one mastic brand) or 133.21 monetary units (for another mastic brand).
- Machine and mechanism operation costs: 15.18 monetary units.
Total direct costs: 178.72 monetary units or 171.93 monetary units depending on the mastic brand.
The prime cost of sealing works, including overhead costs (15% of basic wages and 0.6 monetary units per person-shift), is 185.31 monetary units or 178.52 monetary units, respectively.
6. Labor Safety Requirements
Works for sealing joints in large-panel buildings must be performed in strict compliance with current regulatory documents on labor protection and safety when operating equipment, tools, and devices. Individuals aged 18 years or older, who have undergone a mandatory medical examination, been trained in safe work methods, including fire safety rules, and instructed directly at the workplace, are permitted to perform these works. Persons who have successfully passed the safety examination are issued a certificate of the established form.
Joint sealing works should be performed from suspended scaffolds, in compliance with all instructions for the use of rigging, devices, and collective protection means. Before commencing work, the work areas must be fenced off and warning signs posted. It is strictly prohibited to perform any other work in the fenced-off area. During work execution, it is prohibited to load balconies and floor slabs with construction materials and equipment exceeding permissible loads. Before starting work involving electrical equipment, a mandatory check of the grounding of motor housings, as well as the serviceability of switches and wiring, is required. It is prohibited to perform spark-generating works in areas where mastics are prepared and applied.
Preparation of sealing compounds must be carried out in specially designated rooms equipped with supply and exhaust ventilation, adequate lighting, and fire-fighting equipment. Sealing materials and solvents must be stored in quantities not exceeding what is required for one working shift. Containers with solvents must be hermetically sealed and have labels with the exact material name. When working with sealing materials, special personal protective equipment must be used: specialized clothing, rubber gloves, boots, respirators, and protective goggles. While working with sealing materials, it is prohibited to eat, smoke, or store food products in the workplace. Workers and engineering and technical personnel are obliged to be familiarized with safety regulations, industrial sanitation, and fire safety. Safety knowledge checks and re-attestation are conducted annually.